Project #4 Alt Interface

Family Maker, Ryan Kuo
Description
For project #4, you will pick an existing project from project #1~#3 and add an alternative interface that would recontextualize the experience of interacting with that project. Make an intentional choice on whether this interface will be used on a desktop or on a mobile device. The interface should take the user to pursue an action in a new and surprising way. You are expected to interact with the DOM, and use Javascript event handlers in your interface design.
Class Presentation
Required Reading
(1)
This is Not My Beautiful House, Everest Pipkin
(2) Browse through
Alt Text as Poetry, Bojana
Coklyat and Shannon Finnegan
References
(1)
My Blue Window
, American Artist
(2)
test_print.obj,
Yuehao Jiang
(3)
Infinite Scroll, Kate Hollenbach
(4)
Click Click Click, Studio
Moniker
(5)
Waving
Resources
(1)
w3 schools Javascript tutorial
(2)
w3 schools CSS tutorial
(3)
w3 schools HTML tutorial
(4)
Event Handlers
Timeline & Deliverables
April 1: Submit proposal for your Alt Interface to are.na. The proposal
should include an overall description that describes the goals of your
alternative interface and an illustration of the interface design.
April 8: Complete white-boxed version of the project.
April 15: Project due, present during class.
Submission Guidelines
Submit proposal and white-boxed version of your project to are.na
Submit your finalized sketch to are.na
Design Constraints
(1) Pick your own canvas size. Please be specific
(2) Your project should be either desktop or mobile-friendly
(3) Your project should interact with the DOM
(3) Your project should use Javascript event handlers
Study Guide
Table of Content
(1) Interacting with the DOM
(2) HTML Basics
(3) CSS Basics
(4) Javascript Basics
(5) Document Query Selector
(6) Connecting p5 and Javascript
Interacting with the DOM
Whenever a web page is loaded, the browser creates a Document Object Model (DOM) for the loaded page. DOM arranges all the elements on the web page into a tree diagram —
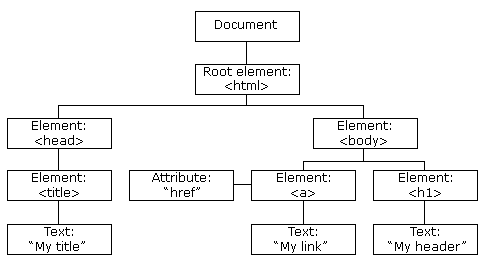
And the amazing part is, we can interact with the elements on this tree diagram from our sketch.js! If you visit the p5 reference's DOM section, you will find a number of examples.
HTML Basics
To have our Javascript library run in the web browser we must link it to an HTML file first. Below is an example of a barebones HTML template that shows proper structure.
HTML elements are placed within two carrots and closed by a carrot slash carrot. There are many different HTML elements like h1 (header one), p (paragraph), h2 (header 2), button, and div. Divs are a very important HTML element. They allow you to organize different elements within them and basically create boxes all over the page. The CSS styling basics takes you through a comprehensive look at how divs are implemented and used for styling.
When downloading a P5 sketch your HTML file will automatically generate script tags for several p5 libraries in the HTML head tag.
When adding in your own js files you will want to follow a certain file structure as shown below. Since they are local libraries you will want to place them in the body tag.
To make sure that your sketch.js runs correctly you must put the library or libraries that you’ve created above it in your HTML body tag. HTML pages load from top to bottom so organization is important here. If you are using variables created in a JS file to affect your p5 sketch it will need to be processed first.
CSS Basics
To link an external stylesheet to your HTML file you will want to add the line below into your head tag. You can replace “mystyle.css” with whatever you have named your own stylesheet.
Here is the basic structure of a css style:
A selector is a keyword or name we use to reference the HTML element we want to edit such as p for carrot p carrot. The property is the name of the setting we want to change such as background-color. And finally, the value is what we want to set that property as, like changing the background-color to blue. This piece of code would look like this.
Here is a helpful reference for different css properties → https://www.w3schools.com/cssref/ . CSS selectors can be any html tag name such as h1, h2, span, etc. But we can also get more specific with them.For example if this is in our html:
How might we change only the second and third div background-color to red? Well, the following CSS will change all of the paragraphs because it simply references the tag.
But!!! We can separate our div elements with something called Classes.
A CSS Class is essentially a custom name that we give to an HTML element that we can then use in our css to reference that specific element. CSS classes are different from CSS **ID's** (which we will explain in a moment..) because multiple html elements can have the same CSS class.
In order to use a CSS Class we have to first edit our html a bit…
We will have to add a class to our second and third paragraph div’s. This class name can be whatever we want! It should just not have spaces or special characters except dashes are ok (i.e. my-cool-class).
But I will choose mycoolclass as my css class for now.
Now that we have our classes in our html we can reference them in our css by putting a . in front of the class name like so…
This will change just the div’s with “mycoolclass” to a background of yellow and leave the other div as red.

Now what if we wanted to change just the first div’s background to pink and give it a green 1px solid green border? We can totally use a class here, but since it's just one element that we want to change, let's use something called an ID…
An ID is similar to a class. It's a name that you give an html element in order to be able to reference it in your CSS. The key difference between a css Class and a css ID is that an ID can only be used for a singular element. Multiple elements cannot have the same ID. So you really want to use it when you only want to target one specific html element.
Let's first add our ID to the html like so…
Then we can reference it in our css by adding a # in front of the ID name...
This will make it so only the first paragraph has a background color of blue and a green border.

You may have noticed that the div’s extend themselves across the entire html page. We are able to change the divs size in our style sheet using width and height. You can define the space it takes up by using pixels, percentages, or VW/VH (which uses the viewport width + height to divide the html browser into 100 units). Using percentages or VW/VH allows for a more responsive web page as it responds to the size of the browser. We are going to comment out the #mycoolclass divs and change our #mycoolid div to take up 25% of the page.

As you can see now our div is responsive in size to the web browser! Yay!
We are now going to comment out our paragraph 1 div and use the two other div’s code again so that we just see this.

By default divs take up the entire space but the display property allows us to tell them to only take up the amount of space they are using and not the whole line. Some display properties include none which makes the div disappear, block which tells div to take up necessary space, and inline-block which will allow the divs to sit next to each other. The code below shows what an inline-block would look like with our divs.

Now you might notice that the text looks a little awkward with the background only covering underneath it. You can use padding and margins to affect the spacing of this, the image below shows how these two properties are defined.

Adding this line of code will allow us to manipulate the margins and padding. Allowing our divs to look like the image below instead.

If you want to change the text color of one of the divs but not the other you can give one of them an ID along with their class name. This ID will override the styling given by the class to allow you to have similar divs that may have slightly different properties. The options for styling are endless and using w3schools as a resource will help you to learn different ways to experiment. :-)
Javascript Basics
Using vanilla Javascript can seem really intimidating at first to new learners. What we have been learning already, p5, is a library that is built off of Javascript. The advantage of using p5 is that there are many functions already built into the library so you don’t have to write out the code for them. When writing vanilla Javascript you may have to take extra steps to write code that you wouldn’t have to before. Much of the language overlaps though and building on top of the knowledge you already have you will be able to write Javascript without any worries!
When creating your own Javascript file you will just need to name it whatever you want and make sure it ends with the extension .js . You will then want to add your file to your HTML by adding the line “” in your body tag. We are going to introduce ourselves to JS by creating a button that will console log “Hello World”.
First we need to add the below line of code into our html body tag to create a button. Which will show up like the image below, you can style your button however you want in CSS by giving it an ID. The button below I have added padding to so we can see it more clearly.

Now without any Javascript written when you click the button nothing will happen. This is where we will write our own vanilla Javascript function. Functions are written the same way as they are in p5, and you can use the template below as a starting point.
To create our function that will console.log “Hello World” for us we are going to write this:
To connect this function to our button we need to add a bit more code to our HTML line.
onclick is an example of an event handler that we can define in html to run a function when an element is clicked, it does not have to be a button. There are many different types of event handlers that you can explore using and learn about on the site https://www.quackit.com/javascript/javascript_event_handlers.cfm . In the quotations that follow we connect it to the function we created “helloWorld()”. Now when you press the button you should see the “Hello World” in the console log.

Document Query Selector
Document Query Selector is a Javascript method that returns the first element that matches a CSS selector. This can allow us to dynamically change something in a document by finding elements with the selector and changing them within a Javascript function. We will be using the button we created in our intro to Javascript to create a function that grabs a div with selector and changes its color.
You can insert your div first by using the following code:
Which will leave you with this result to start:

Now we can start looking at our Javascript again and creating a function that will change our divs background color. Below is the code we will use to start.
This shows a function that looks for your div id, “#myDiv”, and then will console log what it finds so we can double check that it is selecting the correct element. The selector will search the entire page for an element that matches and then will return it in the log. To allow this function to work you will have to change the function that is running in your html to onclick = ”changeColor()”. You will be able to see this in your console now:

To change the divs background color on click you will need to add this line in your Javascript function underneath what we’ve already written.
This allows our function to look within the html file to find your div and change the styles background color to “red”. You can expand on this further by adding boolean statements to your function to toggle back and forth.

You can use the document query selector to select anything on your html file and change its style in whatever way that you want to. You can do many different creative stylings with it!
Connecting p5 and Javascript
Now that we’ve learned some of the ways that we can use Javascript you may be wondering how we can integrate that with our knowledge of p5. You can use p5 and Javascript together to communicate with each other to change different elements on your page. We will walk through an example of how to change the color of a p5 canvas using Javascript.
The important thing to remember when working with p5 and js files that are linked is to keep variable names that you are using the same across both files. To start this example we just need to add this line of code to our empty main.js file.
This boolean will be setting the variable blueCanvas to true. We will then be referencing this variable in our p5 code by writing the code below.
Now when you run your code the canvas will turn blue!!! This shows how you can connect p5 and JS files together. From this starting point you can use Javascript to change different elements of the p5 page and even connect html to it by using the document query selectors we learned about above.